 The fundamental issue of providing heat and comfort is the installation of the floor on wooden logs in a private house, since the wooden base solves the issues of thermal insulation and reducing the load on the foundation at the same time.
The method of the device is determined even during the design, in order to take into account all structural aspects before construction begins.
Floor device
Preference for wood flooring in a private house is given for a number of significant reasons. This material is strong, durable, with low thermal conductivity, not only not harmful, but even beneficial to the health of people in the room.
 The device of the floor on the logs
 Therefore, the tree is often used as a finishing coating on logs, on other types of already constructed bases, if the size of the foundation allows, the height to the doorway:
- cement screed (concrete monolith),
- floor slabs
- hanging lags
- dry screed.
In addition, you can independently make a wooden floor on the ground on the logs in a complex with a draft floor.
For each type, waterproofing is carried out and the inclusion of a warming layer at the design stage.
What is lag
Structurally, this supporting element can be represented by such types of lumber:
- half of the logs disbanded along the axis,
- timber of square or rectangular (1 × 1.5) section,
- 2 boards spliced (knocked down or glued together).
The best option is a one-piece product. If necessary, splicing of 2 parts is used. The connection can be done with a tongue-and-groove tongue-and-groove joint, butt, securing with overlays (at least from 2 sides) with fragments of boards with a length of at least 1 m
 Wood for beams is selected from coniferous species.
This is due to the content of resin in the fibers (moisture resistance) and the cost of the material.
To enhance the water-repellent properties, the outer layers of the tree are saturated with drying oil, molten wax.
Additionally, antiseptic impregnation and treatment with flame retardants should be done.
How to choose a beam
For the assembled flooring, the lags are not only a support, but also a connecting rigid element, so the choice of their section and location step will depend on the thickness of the boards (intrinsic rigidity), as well as the number of support points of the beam, which can hang, rest on columns or lie on a solid surface.
When mounting on a solid concrete base, there is no particular requirement for thickness. In this case, the size is chosen based on the size of the selected insulation and the bearing capacity of the boards (span without deflection).
The necessary section of the lag increases with increasing distance between the reference points and a decrease in the thickness of the laid boards.
How to arrange (general rules)
To make high-quality floors in a private house, you must be guided by the general set of several rules:
- In a rectangular room, the bars are directed parallel to a long wall.
- For a square room, the window is decisive - the lamellas of the floor covering must lie along the light rays from the street, so the beams are laid along the wall with a light opening. If this is not such a significant parameter, then they are oriented relative to the front door.
- Extreme lags need to be indented from the wall no more than 0.2 m. If the calculated placement step does not allow this condition to be met, it is accordingly reduced.
- The upper edges of the logs should be one horizontal plane. To do this, use the water construction level. The flooring is laid on the finished surface, alignment with linings (wedges) should be carried out under the lag.
- The insulation material (roll, plate, foam) is laid end-to-end with a seal to the wood.
- Between the longitudinal lags you can put transverse jumpers. The resulting frame consumes more materials, however, it saves the cost of the floorboard (the thickness decreases due to the increase in the area of the support).
 The creation of adjustable supports for them helps speed up the process of setting the height of the lags by level. This quick method is 1.15-1.2 times more expensive than classical methods.
The logs are placed on the dies, which are moved by turning the nut on the anchor pin (one end is laid in a concrete base).
The positive side is a break in direct contact with the base (moisture rise), the total permissible height of the structure may interfere.
How to make on the ground
The most rigorous approach requires a wooden floor on the ground due to the consideration of contact with the environment. For more information on laying the floor on the ground, see this video:
Structurally, the issue is solved by 2 device options:
- No underground. When the subfloor is directly supported on the ground, the heaving of the soil, the level of groundwater (not closer than 2 m at maximum) should be taken into account. The problem of heaving is removed in 2 ways - by warming the foundation and replacing it with a non-porous look.
- With the underground. The high level of groundwater makes this design mandatory to ensure ventilation of fumes from under the building. The height of rise above the soil level is sufficient in the range of 0.1 - 0.2 m. If the foundation is of a strip type, then it is necessary to arrange in it vents. In pile structures, ventilation is equipped only in the case of facing the base.

Another 2 fundamental differences in the structure of floors - a warm or cold version of the flooring. For housing in a private house, a warm solution (with an insulating layer) is preferable. The cold type is used in utility, technical, non-residential premises, for seasonal buildings or in the southern regions.
Pole floors
 You can create good ventilation and reliable support for a wooden floor on the ground with the help of support columns for logs.
The geometry of the location of the supports also depends on the size of the wooden material, which is planned to be laid on top:

These oborings are laid out from red brick, fragments of concrete blocks, rubble stone, or a ready-made block of the FL type is taken. For frame houses, log cabins, you can put wooden logs impregnated with bitumen. Using a solid boulder is not very reliable due to its irregular shape, which affects stability. For more information about floors on poles, see this video:
The foundation under the pillar is poured 2-10 cm wider than the columns on each side (depending on the loose soil). Deepening is done below the fertile layer, swelling of the soil to a depth of 0.1 - 0.5 m.
 Use 2 methods of pouring foundations under the columns:
- separately install the formwork for each element,
- fill with one tape (reduces the time of work).
When pouring concrete into molds, you should immediately try to maintain the general horizontal level of the tops of the columns. Additional building takes even more time and reduces the strength of the monolith.
Concrete bearings require time to fabricate and solidify. To speed up the construction, asbestos cement pipes or screw piles are used (for large spans, unstable soils).
On the stove
 In modern conditions, the presence of a wide range of building mixtures and materials on problem soils for the foundation and foundation on the ground floor often use continuous pouring of concrete slabs or laid factory floor slabs.
Therefore, the term "flooring on the ground" today includes 2 more options for the construction of floors of the lower floor in a private house: on concrete and hanging logs.
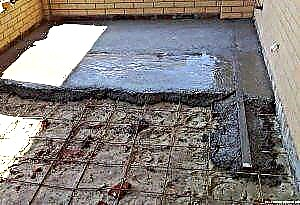 Concrete floors on the ground differ from ordinary screeds in lower temperature and possible humidity. Such a design will include more mandatory layers for normal floor work:
- soil base (flat and compacted),
- a pillow (sand + gravel),
- rough concrete screed
- geotextile, vapor barrier,
- insulation
- plastic wrap
- reinforced plate
- structural elements of the floor.
In case of large irregularities, it is possible to pour leveling screed up to 3 cm thick onto hardened concrete. In this case, it is easier to level the wooden logs. About the technology for pouring concrete slabs, see this video:
The insulation is selected from non-hygroscopic substances. Such materials have proven themselves well:
- expanded clay,
- foamed foam board,
- polystyrene (not so resistant to moisture, but cheap)
- foamed polyethylene (expensive, but reliable, covers any inaccessible places).
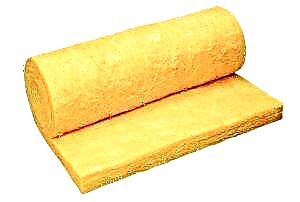 Mineral wool is not used to warm wooden floors.
Mineral wool for a wooden floor on the ground on the logs is better not to use - it is sensitive to moisture. Even with reliable waterproofing, it is better not to risk it.
Often the choice of insulation is determined not only by the cost and ability to lay independently, but also by the total height of the resulting "pie".
Sheet materials (GVP, Chipboard, Fiberboard) up to 2 cm thick are also used as an insulating layer on the slab foundation under the insulation. The thermal gap between the plates is blown with foam. A primer is being applied to protect plywood from water.
The number of layers, their thickness, material suitable for the characteristics in the floor structure can and should vary depending on the location of the construction site - the climatic zone and geological features.
And what are they good for?
Floors made of high-quality wood, with appropriate care, retain their performance characteristics for centuries, are relatively inexpensive, universal (they can be arranged on any type of foundation), harmless to the human body and look very impressive. If necessary, they themselves can serve as the basis for the installation of floors of a different type. In addition, wooden floors are quite simple to install and can be mounted in a private house or apartment, with the help of just one person.
General principles of wooden floors
Direct genital boards always lay on logs , but the lags themselves can be laid both on a concrete or even earthen base, and on supports - usually these are brick, wooden or metal poles. Rarely, but a technology is still being used in which the ends of the lags are embedded in opposite walls or laid on specially provided ledges near the walls and are operated without intermediate supports. However, in this case it is very difficult to cover wide spans - logs of a very large cross section and weight are required, and it is almost impossible to set them correctly alone ...
The device of wooden floors on a concrete base practically no different from the installation of floors in an apartment with ceilings made of reinforced concrete slabs. Much more complicated is the situation with installation of the floor on the first floor of a private house , since in this case it is extremely desirable to arrange a ventilated and DRY underground. Its presence to a large extent determines the strength and durability of the finished floor, especially in cases of high groundwater location.
A few words about the tool
Which tool you need to work depends on the chosen method of floor installation. But in any case, you can not do without:
- laser level, in extreme cases - you can use the hydraulic level, but to work with it you need an assistant,
- regular or cross construction bubble level of at least 1 meter long, the cross level is preferable, since it allows you to align the plane simultaneously in two directions,
- a hammer weighing not more than 500 g,
- chain or circular saw, or a good hacksaw.
- jointer and (or) grinders.
An ordinary carpentry tool - a square, a small ax, a plane, a chisel, a nail puller will not be out of place.
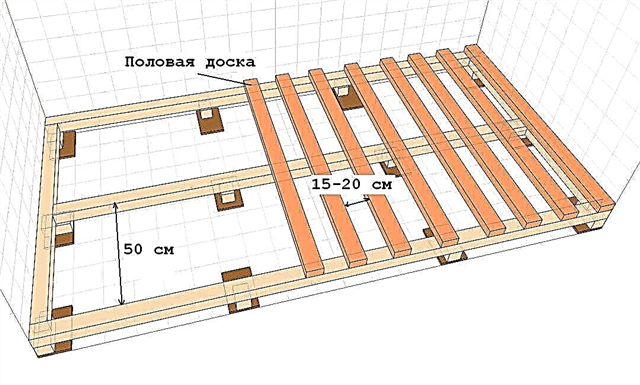
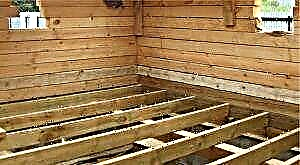
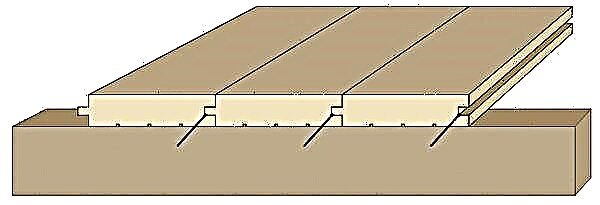
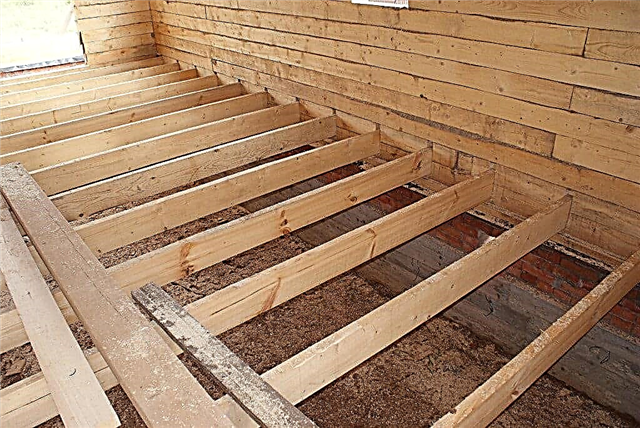
Wooden floor on lags
The figure shows a variant of the construction of a wooden floor on the logs in a private house with an underground space.
The space under the floor is formed due to the fact that the logs are laid on rather high columns of brick or concrete blocks. This design allows you to raise the floor level of the first floor with a minimum amount of backfill soil basement space.
Here, the basement and basement space under the floor are outside, outside the heat-insulating shell of the house, and will be cold.
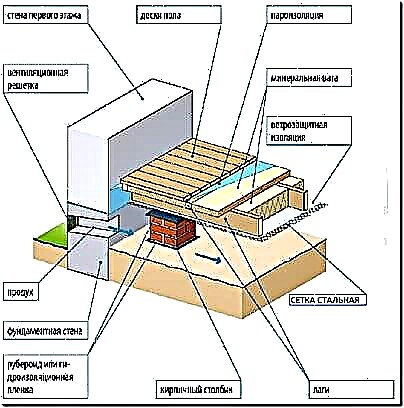 |
 |
To ventilate the underground space in opposing outer walls, above ground level, vents are made - through holes closed with a metal mesh to protect against rodents. The same holes should be in the internal bearing walls.
The movement of air under the floor occurs mainly due to wind pressure.
In winter, there is a risk of freezing of the soil in the underground space, which can lead to the movement of the floor relative to the walls on heaving soils.
To prevent freezing of air, it is recommended to close the air for the winter, and insulate the base.
However, the deterioration of ventilation as a result of closure of vents leads to the accumulation of moisture in the insulation and wooden parts - to reduce thermal resistance and durability of these elements.
I must say that such a device of the underground space has been used in private construction since ancient times. The design was not originally designed to use effective floor insulation.
In houses with poor thermal insulation of the floor in winter, part of the heat from the room penetrated into the underground space and heated it, preventing freezing, but increasing heat loss.
Modern floor insulation practically blocks the heat input to the floor from the premises. The freezing of the subfloor can only be prevented by saving the heat of the earth.
With modern requirements for energy conservation, a cold underground ventilated through the air is not the best option. It is still used rather by inertia.
Scheme of effective ventilation of the underfloor in the basement of a private house through an exhaust duct
More details. . .
To ventilate the underfloor of a private house, a cottage, it is advantageous to use effective ventilation through an exhaust duct. Such a ventilation scheme is the only right option for a house with a warmed basement or basement.
Modern lag floors in a private house do so
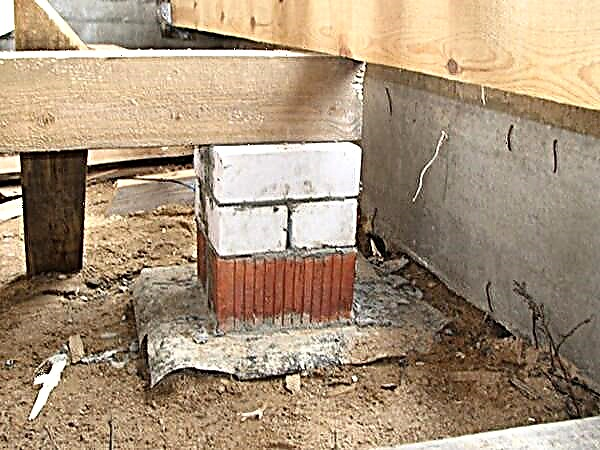
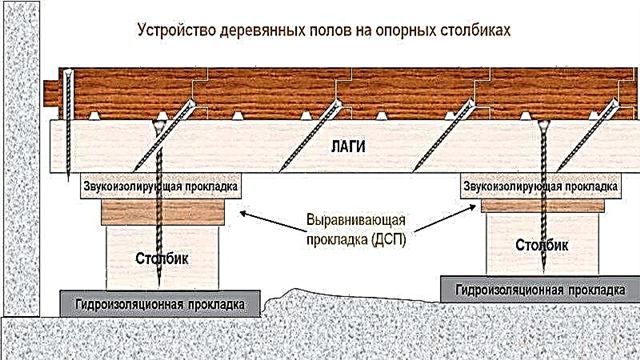
Support columns are laid out of ceramic bricks or concrete blocks. The distance between adjacent columns along the log (span) is recommended to take no more than 2 m. The base of the column can be a layer of compacted crushed stone with a thickness of 50-100 mmspilled with bitumen mastic. Or instead of mastic use a waterproofing film.
The top of the columns is leveled in one level with a solution. When the thickness of the solution is more than 3 cm. masonry net is recessed into the solution. The top of the columns is closed with a sheet of waterproofing material.
Wooden beams-logs are laid on the waterproofing layer. The distance between adjacent beam-logs (step log) is determined by their cross-section, as well as the bearing capacity and rigidity of the overlying layers of the floor - lathing, subfloor, finish coating. Usually take a step convenient for laying between the lags of standard plates of mineral wool insulation, about 600 mm.
For the above step, the lag and the span between the columns, taking into account the thickness of the insulation and lathing, with normal loads on the floor, the lag section is enough 100-150x50 mm On the bottom of the lags lying on the posts fasten a galvanized steel mesh. Instead of a grid, you can nail a board, the slats with a thickness of at least 20 mm.
On top of the grid (boards) and lag, a windproof, highly vapor-permeable film is laid.
Such a film prevents blowing heat from mineral wool insulation, complicates the removal of insulation particles by the air flow (dust formation), but does not prevent the evaporation of moisture from the insulation and wooden parts.
A sheet of windproof vapor-permeable film is laid on top, across the log, and lowered on both sides of each log to the stop in the steel mesh so that a tray forms between the logs. The film is nailed with a stapler to each side of all lags.
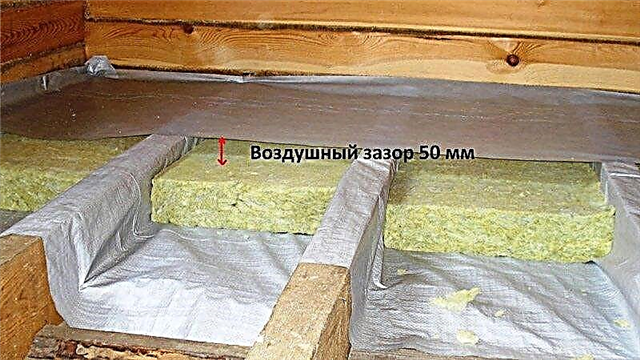
In the formed channel between the lags, mineral wool insulation is laid on a windproof film. You can do without a windproof film if you use special insulation boards with a compacted windproof layer for the lower layer.
How to determine the thickness of the floor insulation
The thickness of the floor insulation is chosen according to the calculation, providing the standard resistance to heat transfer R = 4-5 m 2 about K / W. If the basement is not insulated, then the thickness of the floor insulation is determined from the condition that the temperature of the space under the floor is equal to the temperature of the outside air. The recommended thickness of mineral wool insulation in this case is not less than - 150-200 mm
For a house with a warmed foundation and socle, the thickness of the floor insulation can be reduced so that the sum of the resistance to heat transfer of the socle + floor is no less than normative (see above).
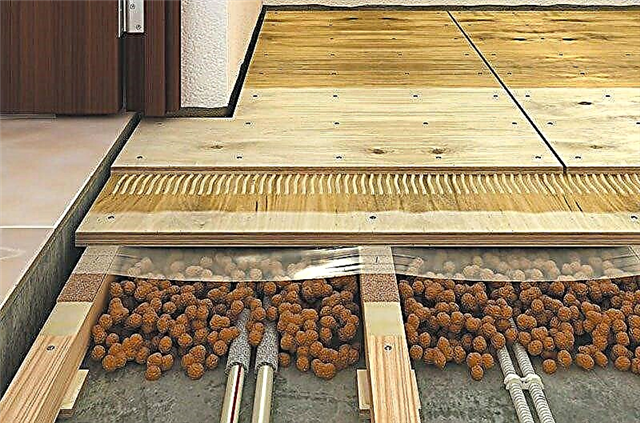
A lath of bars of at least 50 mm thick is laid across the lag. Between the bars of the battens place another layer of insulation. Such a two-layer insulation design ensures that the heater blocks cold bridges through the logs. The distance between the bars of the lathing is chosen in the range of 300-600 mma multiple of the width of the subfloor coating slabs.
Such a two-layer construction of the floor base (logs + crates) allows you to conveniently place both insulation boards and floor coverings (DSP, plywood, etc.).
The insulation with the crate on top is covered with a vapor barrier film. The joints of the film panels are sealed. The joints of the film to the walls are connected to the waterproofing of the wall and the same is sealed.
It is recommended that the thickness of the bars of the crate be selected at 25-30 mm more than the thickness of the upper layer of insulation. This will allow, by lowering the film on both sides of each crate bar, to create a ventilated gap between the vapor barrier film and the floor covering.
Steam- thermal insulation by penofol
| Fix penofol with a stapler on the sides crates or laths. |
Instead of the top layer of insulation and vapor barrier film, it is more profitable to lay penofol - a foamed polymer coated with aluminum foil, 10 thick mm (also available under other trade names).
Penofol must be laid with aluminized side up, towards the ventilated gap, across the bars of the crate and lowered on both sides of each bar. After that, penofol is nailed to each side of all the bars with a stapler so that a gap of 3-4 is formed between the aluminized surface and the floor covering plates cm.. The joints of the penofol panels are sealed with aluminized adhesive tape. The penofol layer will provide heat transfer resistance equivalent to 40 min. mm, and required vapor impermeability.
On the bars of the crate over the vapor-tight film or penofol, boards of the subfloor are fixed. Instead of boards, slabs are often used: cement-bonded chipboard (thickness> 22 mm), plywood (> 18 mm), etc. Sheets, plates are laid with the long side on the bars of the crate. Under the short side between the bars of the battens, the spacers are fixed. All edges of the laid sheet should have a support underneath - a block or a spacer.
The use of polystyrene foam polystyrene boards as a heater is not recommended. Such boards serve as a barrier to moisture always contained in the wood floor. By preventing moisture from escaping from the wood, foam insulation reduces the life of wooden flooring. In addition, mineral wool insulation, due to better elasticity, adjoins lags more densely than polystyrene.
To protect the underground space from soil moisture, it is advisable to cover the entire surface of the soil with a waterproofing film (and not just under the columns, as in the picture). The joints of the coating panels are sealed. The adjacency of the film to the walls must be connected to the waterproofing of the wall and also sealed. The columns of the floor lie directly on the film.
As a result, we get a ventilated underfloor space limited by hermetic shells - above (vapor barrier) and below (waterproofing).
Such an underground space protects the house not only from moisture and cold, but also from penetration into residential premises radon soil gas.
Floor on the lags on the intermediate walls
 |
| Floor on the lags on the intermediate walls |
In modern floor constructions, beam-logs are located at a small distance from each other, which allows the use of lumber of a smaller section, and hence cost, and it is also convenient to place insulation boards.
Instead of brick columns, lags can be advantageously supported on intermediate walls laid across the lag with an interval of about 2 m. Bricks or blocks in the wall are laid using a half-brick-thick honeycomb masonry method, leaving 1/4 of the brick extended spaces in vertical joints for ventilation of the underground space. If the wall has a height of more than 0.4 m, then at least every 2 m the length of the wall, lay out the pilasters - columns thick in brick, to increase the stability of the wall.
If the step lag is not more than 600 mm and span less than 2 m, then the cross section of a wooden log is enough to have 100x50 mm.
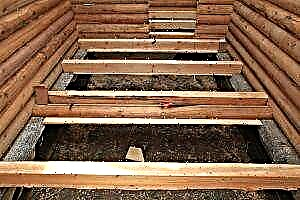
Wooden floor on the ground on the logs
Another version of the wooden floor on the logs in a private house is shown in the following figure:
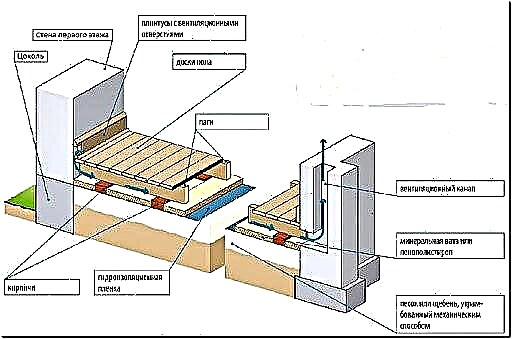
Here, unlike the first option, the floor level is raised to the required height due to backfilling of the basement with compacted soil.
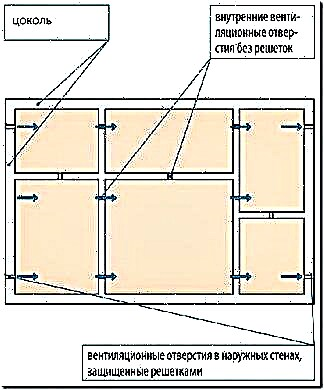
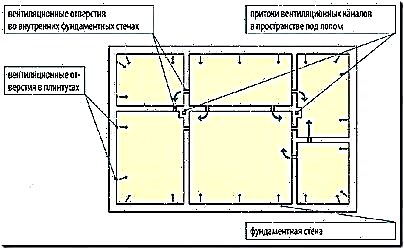
Floor ventilation is carried out due to the movement of air under the influence of the draft of the ventilation duct.
Warm air is taken from the room and through the ventilation holes in the skirting boards and the gap between the subfloor coating and the wall enters the space between the lags. Next, air enters the ventilation duct.
To ensure the ventilation of the underground space, skirting boards with holes are used or the installation of skirting boards with a gap between them and the walls is provided.
In order for the air to move more or less evenly under the entire surface of the floor, the gap for the passage of air is made of different widths - the farther from the ventilation duct, the wider the gap (2 cm.) Near the ventilation duct, the holes in the skirting boards and the gaps between the wall and the flooring are not made (or the gap is sealed with tape).
It is important to understand that in this type of ventilation, unlike the first, the underground space is inside the heat-shielding shell of the house, and it must be warm. The outer shell of the subfloor must have a heat transfer resistance of no less than the wall of the house. Otherwise, the entry of warm air from the room may cause condensation to form on the subfloor parts.
Make a layer of bulk soil thicker than 600 mm Not recommended. Pour the soil and carefully tamp with layers with a thickness of not more than 200 mm. Compaction of bulk soil to the state of natural soil still fails. Therefore, the soil will eventually precipitate. A thick layer of bulk soil can lead to too large and uneven subsidence of the floor.
The waterproofing film is laid on a leveling layer of sand with a thickness of at least 30 mm. The joints of the film panels are sealed. The joints of the film to the walls are necessarily connected to the waterproofing of the wall and are also sealed.
Thermal insulation is laid on waterproofing.
In this embodiment, it is better to use polymer insulation boards - polystyrene (polystyrene foam). Insulation thickness is enough 50-100 mm, since the temperature of the soil under the house is always positive.
If the walls and the basement of the house are not insulated, then at least 800 along the outer walls mm a thicker layer of insulation should be laid, 150 - 200 mm.
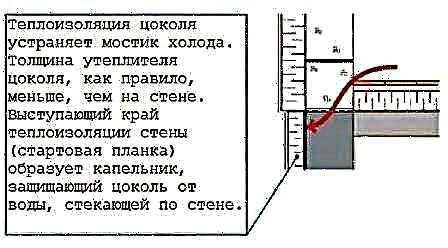
At a house with multilayer external walls with insulation on the outside, to exclude a cold bridge, bypassing the insulation of walls and floor, base is insulated without fail (see the figure in the first part of the article).
Logs of the floor lie on low lining made of brick or concrete blocks.
If plates of extruded polystyrene foam (XPS, penoplex, etc.) are used as thermal insulation, then the logs can be laid on the lining cut from these plates.
A gap of 3-5 should be provided between the insulation and the wooden logs of the floor. cm. for free air movement.
According to building rules, there is one restriction on the device of the floor. Since the space under the floor is ventilated through the exhaust duct of natural ventilation, it is forbidden to make the final floor covering from combustible materials: from boards, parquet boards and boards, etc. Or a non-combustible base should be provided under them, for example a prefabricated screed made of plasterboard, gypsum-fiber sheets or a rough floor made of chipboards.
In this embodiment, the logs and other floor elements are in better humidity conditions than in the first case.
Floors, soils and foundations
The floors on the ground are not connected with the foundation and rest directly on the ground under the house. If the soil in the area is heaving, then the floor in winter and spring can "wobble" under the influence of frost heaving of the soil. To prevent this from happening, the heaving soil under the house must be forced not to heave. The easiest way to do this is by insulating the base and the underground part strip foundation.
The construction of pile foundations on bored (including TISE) and screw piles involves the installation of a cold base. Insulation of soil under the house with such foundations, the task is quite problematic and expensive. Ground floors in a house on a pile foundation can be recommended only for non-heaving or slightly heaving soils in the area.
When building a house on heaving soils, it is necessary to insulate the basement and the underground part of the foundation to a depth of 0.5 - 1 m.
 |
| In a house with external multilayer walls with insulation from the outside, a cold bridge is formed through the basement and the bearing part of the wall, bypassing the insulation of the wall and floor. |
In addition, the insulation of the basement will help eliminate the bridge of cold, and will also reduce the thickness of the floor insulation. About how to determine the required thickness of the vertical thermal insulation of the basement and the underground part of the foundation find out here.
Log specifications and installation requirements
Logs are distinguished from beams by their smaller size and mobility. If the beams after installation can not be moved, the repair is very long and time-consuming, then the logs are a mobile architectural element. They are much easier to install, if necessary, repairs are faster.
Lag distance
Optimal section proportions
Before proceeding with the construction of the floor, it is necessary to study the requirements of regulatory documents for the size of the lag and the distance between them, taking into account the thickness of the floorboards.
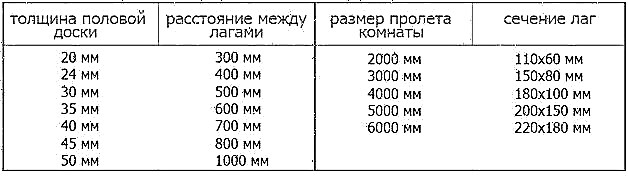
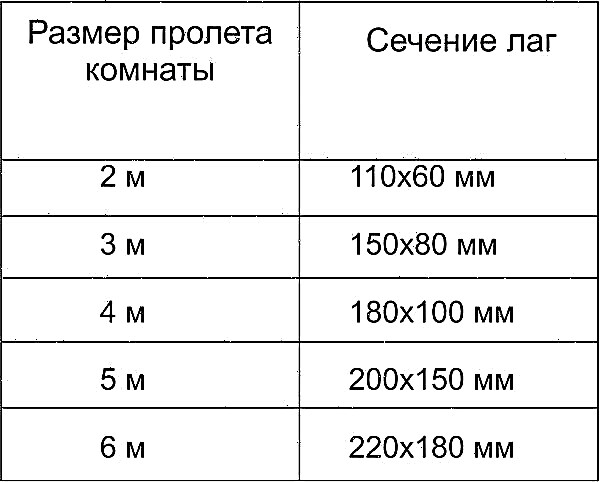
Log section table at a step of 70 cm
The distance between the supports of the lag Linear dimensions lag 200 cm 110 × 660 mm 300 cm 150 × 80 mm 400 cm 180 × 100 mm 500 cm 200 × 150 mm 600 cm 220 × 180 mm
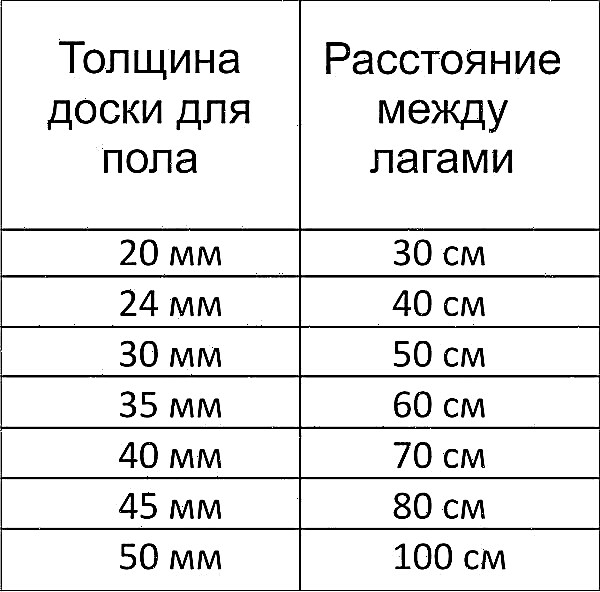
Table of the distance between the lags depending on the thickness of the board
The thickness of the floorboard from pine, mm The distance between adjacent lags, cm 20 30 25 40 30 50 35 60 40 70 45 80
In order to learn how to independently make calculations based on tables, it will be useful to consider the simplest example. Initial data: the length of the room is 10 m, take a floorboard 30 mm thick.
According to the table, with such a thickness of the board, the distance between the lags is 50 cm, with a dine of 10 m, 20 lags are needed. Removing the lag from the walls cannot exceed 30 cm. This means that we will have to increase their number by one piece, the distance between the rest will decrease to 45 centimeters.
Important note. During calculations, all rounding needs to be done only in a smaller direction, thus creating an additional margin of safety.
No need to calculate the sizes and distances to the nearest millimeter, no one is engaged in such measurements. By the way, during construction, the vast majority of architectural elements and structures are measured in centimeters, the highest accuracy - half a centimeter. Millimeters are almost never used during measurements.
As a log, a wooden beam of rectangular section can be used
Installation of brick pillars
 The best choice for today is brick poles, which have acceptable strength characteristics, are quite affordable from a financial point of view and do not require special labor for the construction. The only limitation is the height of such support columns shall not exceed 1.5 m if it is greater, to maintain the strength of the supports, it will be necessary to increase their cross section, which will lead to a sharp increase in the required number of bricks and, accordingly, an increase in material costs for construction. With a column height of 50-60 cm, a 1x1 brick section is sufficient, at a height of 0.6-1.2 m, a section of at least 1.5x1.5 bricks is made, columns up to 1.5 m high are laid out with at least 2x2 bricks.
Anyway it is necessary to fill in concrete "nickels" under brick supports , the area of which exceeds the cross-sectional area of the columns by at least 10 cm in each direction. The distance between the centers of the sites is selected within 0.7-1 m along the logs and 0.8-1.2 m between logs with a cross section of 100 ... 150x150 mm. After marking in the places of erection of pillars, pits break out about a half meter deep, the main thing is that the bottom should be below the fertile layer of the earth. At the bottom of these mini-pits, a sand and gravel "cushion" is made, onto which the concrete mixture is poured. It is desirable that the surface of the resulting “five-copeck coin” is a few centimeters above ground level.
It is at the stage of laying out the support pillars laying the horizontality of the future sex , and it is at this stage that the laser level is best used. With its help, the LOWER EDGE LAG level plus 1 cm is marked on the walls, a building cord is stretched between the opposite walls at this level, and the height of the posts is adjusted according to its level. It is completely optional to display it strictly up to a millimeter - a gap of a couple of centimeters is quite acceptable. When calculating the total thickness of the floor, it should be taken into account that at least its upper plane should be higher than the basement level of the building - otherwise it will be extremely difficult to avoid the “cold bridges”.
Some features of support pillars
It is worth foreseeing in them the presence of mounts for beam beams . Usually, such “fasteners” use vertical “studs” threaded in or 10-20 cm threaded or anchor bolts - later on, through holes are drilled in the lags at the appropriate places, with which the beams are “mounted” on the resulting pins and are attracted by nuts and washers. Protruding excesses of “thread” are cut off by “grinder”.
The lateral surfaces of the columns and, especially, their upper plane on which the lag will be laid, preferably cover with a layer of durable plaster - it will additionally strengthen the design and play the role of additional waterproofing. On the surface of the finished columns is laid 2-3 layers of small pieces of roofing material.
After complete drying and hardening of the masonry mortar (this takes about a week), logs can already be laid on the finished support posts.
Floating or hard floors?
In the first case, the entire “sandwich” of the floor lies and rests solely on the posts, not being rigidly attached to the walls or foundation of the building. In the second, the ends of the lag are firmly attached to the walls in one way or another, this design virtually eliminates the "walk" of the flooring, but when the building sags, it can completely lead to deformation of the finished floors.
With the "floating" version of the floor, the length of the lag is 3-5 cm less than the distance from wall to wall. In the second case, the gap should be no more than 2 cm - otherwise the lags will be difficult to firmly attach to the walls. If necessary, lags can be made of two or more pieces, connecting them into "half-paws" - but the joint must necessarily fall on the support pillar and be nailed or (with a cross-section lag up to 10x100 mm) bolted with screws.
If the final length of the log is less than three meters, then they can be laid directly on the supports (without forgetting about waterproofing gaskets from roofing material!), However, it is much better to put a flat piece of board 25-50 mm thick between the roofing material and the lower plane of the log beam. In the case of skirmishes, this must be done!
Lag leveling
After laying the lag on the prepared support pillars, they must be “set” by level. This is done as follows: with the help of wooden gaskets of small thickness two extreme beams are laid horizontally , according to a previously calculated and marked level of height. Gaskets are so far used only on the extreme support pillars, while intermediate ones can be ignored. The ends of the exposed lags are nailed to the walls, in the case of "floating" floors, this fastening will be temporary.
On both sides, at a distance of 0.3-0.5 m from the walls, on the upper planes of the laid logs tight the building cord is pulled.It displays all the other intermediate beams, then, if necessary, gaskets are installed between the remaining columns and lags. ALL gaskets should be firmly attached (nailed) to the lags, and, if possible, to supporting posts. The beams should lie tight on the poles, in extreme cases, gaps of no more than 2 mm are allowed - but not on adjacent poles.
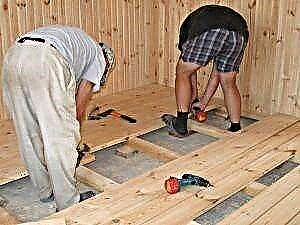
Rough floor
 After laying the log, a rough floor is made. To do this, along the entire length of the lower cut of the log, a narrow bar (“cranial” bar) is nailed on each side of it. Untreated boards are laid on it between the lags with a length equal to the distance between the lags. After laying, these boards are “solid” covered with a vapor-insulating film, on which the insulation is applied or filled up. From above, everything is completely covered with a windproof cloth.
Underfloor ventilation
When installing the floor on brick pillars in the underground space ventilation must be arranged - forced (with a large cubic capacity of the underground) or natural. A mandatory element of such ventilation is the so-called "Blows" : Through holes in the foundation or walls below the floor. Such holes should be available around the perimeter of the building and under the internal partitions, the distance between them should not exceed 3 m.
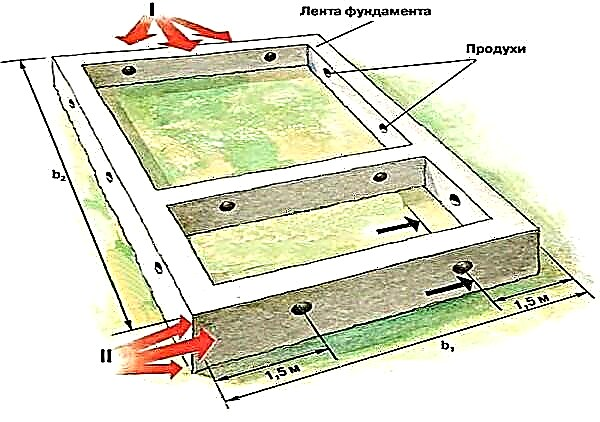 The dimensions of the vents are usually selected 10x10 cm, the center of the hole should be at a height of 0.3-0.4 m from the ground level (above the thickness of the winter snow cover). Be sure to provide for the possibility of overlapping vents in the winter. In addition, in order to protect against rodents, vents are closed with a fine mesh.
When if the underground is not too deep (not more than 0.5 m) and the device of the ventilation is difficult, vents are made in the floor itself - usually in the corners . These openings are closed with decorative grilles and must always be open.
How to lay floors
Before laying floorboards, the insulation is covered with a windproof cloth. The choice of the board depends on what kind of surface the finished floor will be. If it is conceived naturally - you will need a grooved floorboard (with a lock), if linoleum or laminate is laid - it is quite possible to do with an ordinary edged board. BUT ANYWHERE, WOOD SHOULD BE GOOD DRYED!
We fix the grooved board to the logs
 The first board is placed with a gap of 1-1.5 cm from the wall, and not close to it, with a spike to the wall. The following boards are pressed to the previous ones using some kind of emphasis (clamps, for example) and a pair of wooden wedges. The boards, especially if they are thicker than 25 mm, are nailed - screws in this case do not fit, they do not attract the board well to the upper surface of the log. The specified gap of 1-1.5 cm should be maintained around the entire perimeter of the room. The existing joints of the ends of the floorboards must be staggered.
Finished floor finishes
After the flooring has been laid, the floor is ready for finishing, which consists in grinding (scraping) and coating with paint or varnish . Manually doing this is almost impossible - you should use an electric jointer or grinder. After this very dusty procedure, it is recommended that everyone “open” treat cracks and crevices between the boards with wood putty made on the basis of drying oil. The last operation before painting is fixing the baseboard around the perimeter of the room.
The polished surface is painted or varnished, for example, yacht, modern paints and varnishes can simulate almost any type of wood or material surface. Usually at least two layers of coating are applied; a paint roller and a good respirator are used for work. If you want to get not a glossy, but a matte floor surface, you can use wax or oil.
Summarizing
Laying the floor on the logs - the construction operation is not the most time-consuming, but requiring a careful approach to the implementation of work and careful consideration of their actions. But on the other hand, with the right approach, all work can be done with your own hands and in a fairly quick time with minimal financial costs.
Pros of the device of the floor on the logs
Logs installed as a support on a wooden floor are very functional. In addition to their direct responsibilities, they also:
- create a uniform load on the soil in a private house and overlap (if the floor is laid in an apartment building),
- level the surface under the coating (do-it-yourself floors can be raised or lowered with your own hands to create a perfectly flat surface regardless of the initial parameters of the room),
- create between the floor and the floor a free, ventilated space in which you can hide communications that are undesirable for everyone to see,
- increase the sound insulation of the room,
- facilitate the procedure of floor insulation.
In addition, individual log bars, if necessary, can easily be replaced without spending large-scale repairs in the house.
Structural features of the floor on the logs
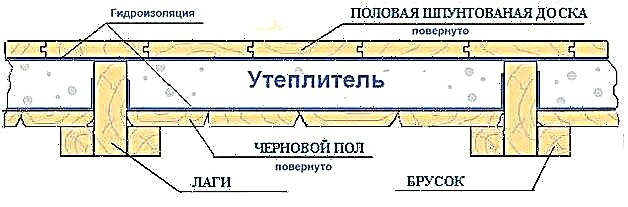
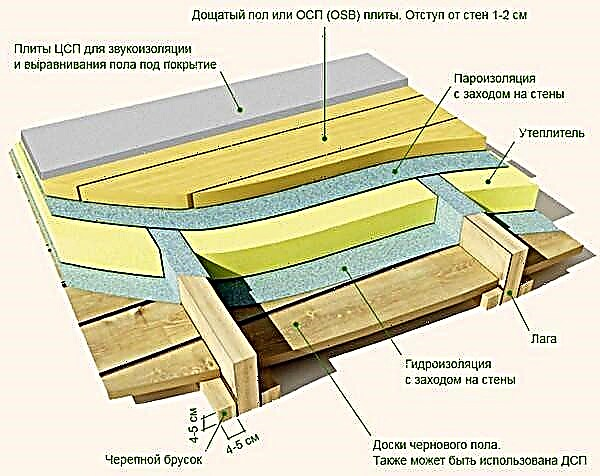
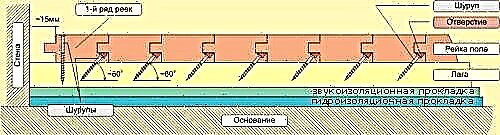
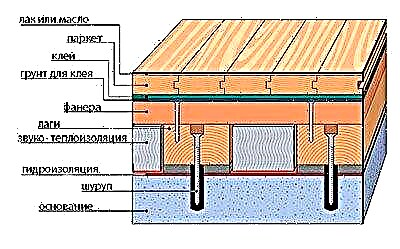
The device of the finished wooden floor on the logs somewhat resembles a multi-layer cake, in which on top of the overlapping layers it is necessary to lay boards, logs, a waterproofing layer, insulation, and the floor finish.
The device of the floor on the lags involves the installation of waterproofing and insulation
In this case, regardless of the type of overlap, the cake of the insulated floor includes additional elements:
- waterproofing layer between the ceiling and the logs,
- log bars
- rough floor (plywood boards are preferred),
- waterproofing insulation coating,
- insulation and vapor barrier itself,
- boards - topcoat.
This design of floors on the logs is relevant for the first floors in private homes. All subsequent floors do not need such a serious insulation, the installation of a waterproofing layer of the cake in this case is only necessary with direct contact with concrete and brick.
It is necessary to insulate the floors of the first floors and concrete or brick foundations
Self-made lag technology and wood selection
Logs can be purchased at the store, or you can do it yourself. The second option will cost relatively cheaper. Best for these purposes, wood with a moisture content of not more than 15-17% of the 2nd or third grades is suitable. Logs can be made from pine, fir, spruce, aspen and larch.
If you make logs yourself, consider that the cross-section of the beam should be rectangular. About twice as high as width. The desired size is determined based on the parameters of the room, to be more precise: based on the exact distance between the strapping links from the timber.

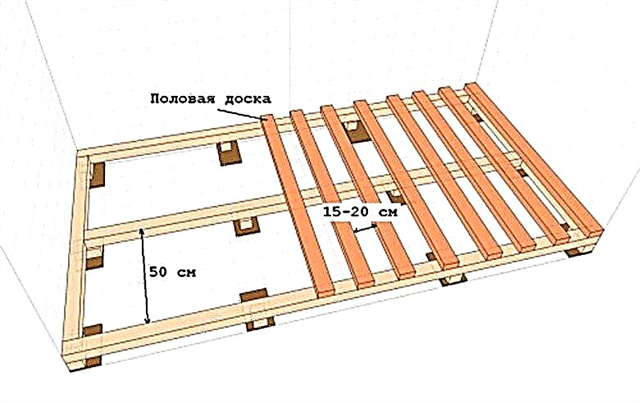
The size of the bars depends on the distance between the strapping links
In addition, it is necessary to take into account the thickness of the insulation layer and the size of the spans. In the illustration you can observe approximate calculations with laying the lag at a distance of 70 cm from each other.
If your room has an intermediate size between the indicated values, it is worth taking a larger value as a basis. So you will have some stock of material that will allow you to lay it without gaps and make the structure more durable.
To make a wooden floor with your own hands, you can use both edged and grooved boards. The second option is much preferable, because its device involves a groove and a spike, therefore, the installation of a fine finish is not so relevant.
It is preferable to use tongue-and-groove boards thanks to the tongue-and-groove system
You can use floorboards made of cedar, larch, spruce, aspen and pine. The most expensive and durable materials are oak and pine massif: provided that the installation is carried out correctly, they will last several decades. In turn, larch is excellent for rooms with high humidity, because it is not subject to decay, and healthy aspen and alder boards are great for sleeping rooms.
Oak and pine boards will last a long time
If you purchase floorboards of the first grade, you can not splurge on the final flooring, but at the final stage just sand the boards and open with varnish.
The main thing is that before laying it is necessary to treat the boards with antiseptic antifungal drugs and soak with a water-repellent composition.
If you are installing a wooden floor with your own hands, carefully consider the choice of wood: the boards should be dry, but not overdried. Wet wood, after drying and under furniture pressure, may become deformed. Always buy boards with a margin of 15-20% in case you need pruning, mistakes and marriage.
How to independently calculate the required distance between the lags?
When you install the floor on the logs, operate with the rule: the thicker the floorboard, the wider the installation and the further apart the logs are.
For example, for a board whose size is 5 cm, you can take a step (the distance between the lags) of one and a half meters.
If you use thin boards, you can take a small step so that there is no deflection of the board. The most common step length between the lags is 50-70 cm.
The distance between the lags most often is 50-70 cm
Also consider that you need extra distance to make it convenient to lay the insulation inside. If the size of the base does not match the values in the table, then it is calculated upwards.
Basic rules for installing lags
With self-assembly, the lag should strictly follow the following rules:
- Before installing the lag, the surface must be cleaned and opened with a primer,
- all wooden elements of the cake’s construction are carefully dried and processed with antiseptic antifungal drugs,
- as a sound insulating material, sand or fiberboard can be used,
- do-it-yourself adjustable floors must be well fixed, and then use the building long level to make sure that the logs are installed directly horizontally,
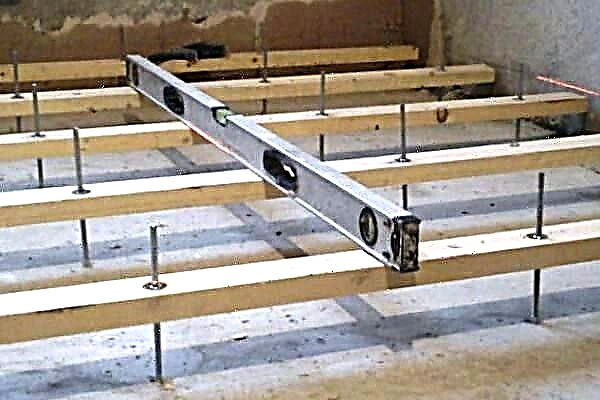
To control the horizontal structure, it is necessary to use the level
Installation of wooden logs for the floor
Wood is a floor covering tested by time and centuries of experience. Stacked correctly, it can serve for decades and not lose appearance. In addition, it is the most environmentally friendly, “breathing” floor, guaranteeing a high degree of heat and sound insulation of the premises of both a private and an apartment building.

The design of the wooden floor on the logs
To lay the wooden floor on the logs was quick and comfortable, you will need the following tools: level, hammer, saw and ax, hammer, nail puller, drill, screwdriver and keys. And also the following materials: floorboards (sometimes the role of the subfloor is assigned to plywood boards), logs, insulation material, fasteners (anchor bolts, self-tapping screws and nails).
If all the necessary materials for installation are available, you can start laying the lag on top of the soundproofing material. As already mentioned, the surface must be leveled, checking its horizontality at the building level. Boards are attached to the logs using dowels.
Now it is worthwhile to consider in more detail the entire technology of the device of the floor on the logs in a private house.
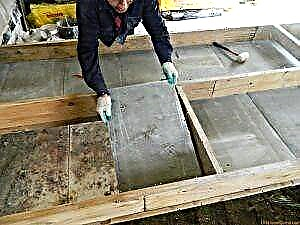
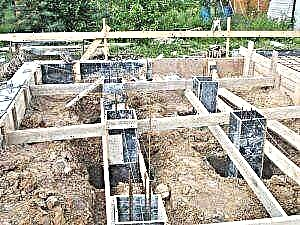
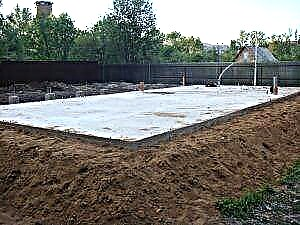
The first step is marking the working area and preparing the foundation. First, compact the soil and fix the formwork with ten-centimeter sides. At the bottom lies a reinforced mesh and then the concrete mixture is poured. For the concrete to dry, you need to wait a couple of days. After that, a waterproofing polyethylene film is laid on top of the concrete floor, and then supporting structures are built.
If the floor is cold, the space that remains under it after its construction must be covered with sand or expanded clay (not topped up to the top, you need to leave about 5 cm of free space).
You can insulate the floor with expanded clay
The second step will be to ensure normal ventilation of the space under the floors. For these purposes, small holes are made around the skirting perimeter (for every 15 sq. M), which, in order to avoid getting mice in the house, are closed with a non-ferrous metal grid.
The next step is floor insulation. Expanded polystyrene, isospan or heat-insulating roll material are perfect for these purposes. This material is laid on the waterproofing layer of the isolon, which is attached in advance to the logs using an industrial stapler.
After laying the insulation, you can begin to lay the boardwalk over the lag. Installation must begin from the corner of the room. The boards are screwed directly to the lags using self-tapping screws.
The scheme of the wooden floor
If the boards are finished and well sanded, they can play the role of finishing, finishing flooring. If it is assumed that the topcoat layer (laminate, parquet, linoleum, etc.), you can start laying it immediately after finishing work with fixing the boards to the logs.
Thus, the installation of the floor on wooden logs has many advantages over laying the floor directly on top of a concrete or soil floor. In addition to smoothing out all the irregularities of the floors and distributing the load evenly, it also perfectly insulates the housing and contributes to noise absorption.
Korovin Sergey Dmitrievich
Master of Architecture, graduated from Samara State University of Architecture and Civil Engineering. 11 years of experience in design and construction.
Floor Base Options
These types of floors can be installed on a wooden and concrete base or on the ground. Each option has its own technological features, which must be borne in mind during the work. As for the specific purpose of the premises, taking into account this parameter, the base of the floor and its operational characteristics are selected. The device technology itself is almost unchanged.Of course, there are options for warm and cold floors, but these features also have a common construction algorithm.
The device of the wooden floor on the logs on wooden bases
Such floors can be made in both wooden and brick buildings, and can have several varieties. You need to consider the features of flooring at the design stage of the building. Not only the purpose of each room and its size, but also the climatic zone of residence, microclimate requirements and the financial capabilities of the builder are taken into account. Below are step-by-step recommendations for the construction of this type of floor.
Laying a wooden floor on the logs in a wooden house
Wooden floor - photo
Depending on the specific conditions, the algorithm can be slightly modified, but all major construction operations are required. The basis can be moisture-resistant OSB boards or sheets of glued plywood. The design of flooring provides for the possibility of laying heaters, it is allowed to use rolled and pressed glass wool or polystyrene. If there is insulation, then it is necessary to put hydro- and vapor barrier.
Step 1. Take the dimensions of the room and calculate the number of lags, taking into account the above recommendations. Prepare materials and tools, make markup. Do the work slowly, mistakes made at this stage have extremely negative consequences. Their elimination will take a lot of time.
Step 2. Start installing lags from the extreme wall. If the room has black floors, then the lags can be fixed directly to them. To facilitate the work, it is better to use metal squares with perforation, such elements significantly accelerate the work and increase the stability of the lag. According to the mark on the wall, taking into account the thickness of the floorboards, expose one end of the log, fix its position.
Installation of a lag of a floor
Practical advice. During the installation of extreme lags, do not fix them immediately, at first, self-tapping screws should only be baited. This will make it possible to make final fine adjustments.
Do the same actions at the second end of the lag, constantly monitor its position in terms of level. The lag code is normal, you can firmly fix the ends and proceed with the installation of intermediate fasteners. The distance between them depends on the thickness of the boards that are used for logs, it is about 70 centimeters.
Step 3 Between the extreme lags you need to pull the ropes, on this line set all the remaining lags. Constantly check the level, the accuracy of the installation should be ± 1-2 mm. There is no more sense, it takes a lot of extra time. A slight difference in height will be removed during the finishing of the front surface of the floorboards.
Step 4 If the floors are warm, then it is necessary to put thermal insulation between the logs, to prevent moisture ingress, waterproofing and vapor barrier are used. The distances between the lags must be adjusted taking into account the length and width of the insulation. This can be either mineral wool or polystyrene, and bulk types of insulation. If all the preparatory work is completed, then you can start laying the floorboards.
Thermal insulation between lags
Mineral wool floor insulation
There are options for installing logs on floor beams. These are the so-called ventilated floors, most often used for non-residential premises. It is not necessary to observe special accuracy, alignment of sizes is done with lags. Logs to beams are fastened with nails or screws on the side. The algorithm of work is the same. In the beginning, extreme ones are placed, a rope is pulled between them and all the others are fixed along it.
Laying the log on the lower beam beams
Ventilation is carried out through special products in the foundations, the distance between the ground and the floor should be at least fifty centimeters. Otherwise, the air exchange rate does not meet the required indicators, and this becomes the cause of damage to wooden structures.
Laying logs on the ground
The method is used for outbuildings, bathhouses, arbors, verandas, etc. Wood must be treated with antiseptics. The foundation is better columnar, if you want to make a more durable tape, it is necessary to provide for ventilation in advance for natural ventilation.
Floor on logs on the ground
How is such a floor made?
Step 1. Remove the fertile soil. You can add beds to them or level the area in front of the house.
Remove the soil layer
Step 2. Mark the columns. The distance between them is selected taking into account the load and size of the lag. Columns can be made of concrete, block or prefabricated. The dimensions of the supports are approximately 40 × 40 cm, the depth of instillation is within 30 cm. A layer of sand ≈ 10 cm thick should be poured onto the bottom and rammed.
Step 3 Fill supports with concrete. To prepare concrete, two parts of crushed stone and three parts of sand should be taken on a part of cement. Water is added as needed. Formwork can not be done in the ground; a formwork of boards or OSB scraps is installed above the ground. During the manufacture of formwork you need to use the level, all faces should be strictly vertical.
Wood floor base
Ready-made concrete posts
Practical advice. It is much easier to make columns from ready-made blocks. Horizontal alignment must be done on a rope. After the extreme exposed at the hydraulic level, a rope is pulled between them. Deviations should not exceed ± 1 cm. This spread is eliminated during installation of the lag.
Installation of blocks for logs
Laying columns under the logs of the wooden floor, scheme
Step 4 Proceed to fix the lag, you need to start work also from the extreme. For precise horizontal alignment, you can use the pads. It is undesirable to take wedges from wood, over time they will dry out and reel will appear: the floor will creak unpleasantly while walking. Between wooden structures and concrete surfaces, it is necessary to put two layers of roofing material for reliable waterproofing.
Supported lags
Step 5 After the extreme logs are laid, a rope is pulled between them and all the remaining ones are laid under it. Logs are fixed with metal squares on dowels and screws. To increase stability, it is recommended to install them on both sides. Floor boards can be laid directly on the logs or pre-lay the draft floor. The final choice depends on the features of the operation and purpose of the room.
Wooden floor on logs
Logs laid on blocks and waterproofing
Log Pro Tips
Coniferous wood should be used for logs.
Larch lags
If possible, materials should be impregnated with antiseptics. These are very effective means to protect the tree not only from fungi, but also from many pests.
Wood preservative
Always select lags with a margin of safety, especially in cases where the installation method involves bending loads. It must be remembered that correcting mistakes made during the construction of floor coverings always costs much more than performing work with high-quality materials and observing the recommended technologies.
Choose lag boards carefully. They should be absolutely healthy without traces of rot. The presence of through cracks and rotten knots is completely prohibited. If there are large healthy through knots, then you need to install the logs in such a way that under them there is emphasis.
During fastening of a log do not allow probability of emergence of reels.
Firmly fix the logs
Most lag reels cause very unpleasant creaking of flooring while walking. To eliminate such phenomena, it is necessary to remove the floor coverings, it is long and expensive, it is not always possible to keep the dismantled materials in a condition suitable for reuse.